New vrnTech logo design: learning a bit of Hexels

Making Of / 09 March 2018

I feel like I need to overhaul my logo design with something more modern and up-to-date. A perfect excuse to get to know Hexels and get out of my 3d confort zone a bit. I've dabbled in logo design in the past but never quite enough to have something worthy to post online. So bear with me as I try and redesign my logo with very little experience or skill in logo design!

Started off with my old logo which I sketched on a napkin back in high school. Serif fonts were big back then! I put together my initials (V, R and N) and got my own sweet looking logo! (R comes from Razvan if you need ask!)

 A while back when I started my Artstation page I decided that I will make it 3d and use it to brand my work. Here it is, in all of its Marmoset Toolbag rendered shiny-ness!

Needless to say it looks a bit dated so I decided to do a new one!

First up was a simple 3d cube with the initials on it. Looks a bit "youtube-ish" and you can't really tell if that top letter is an N or a Z so I had to sideline it for the moment. Learned how to use all the grid options in Hexels to paint 3d-looking stuff in the end, so that's a plus!


Back to the old drawing board. This time, the trusty math notebook. I wanted to get away from Hexel's "trixel" grid and think freehand.

I ended up taking inspiration from Artstation's logo by flipping it to get a V-looking shape and trying to integrate the R and the N whilst keeping lines paralel. The V ended up being defined by the overall shape of the logo and the R and N and suggested by the cuts together with the negative space around the "V". 

The orange is the same color Maya uses for their polygon commands shelf buttons. I chose it because it directly links my portfolio to the thing I do best: 3d modeling with polygons in Maya and looks like a sci-fi technical utility icon, again something that's closely related to my hard-surface inclination.

Looking at this first draft, somehow the top corners did not look right. Although they help the general "V-ness" of the shape, they added a bit too much "top weight" to the logo by not being parallel to anything else so I had to revert to something that looks a bit more like the Artstation logo that I would have hoped.

It was at this point that it hit me: "HALF LIFE 3 CONFIRMED!" as it looks too much like Valve's lambda symbol. Since the R is not that easy to make out, I did a bit more cutting to get this shape. As a byproduct, there's a nice hex there that breaks up the symmetry of the whole shape. There's good and bad with that but at least the reversed lambda symbol is not that obvious anymore.

I settled on this as the final shape. Can't see the  V, R, N letters? Here's a basic animation. Again in Hexels and with some sweet RGB over-the-top glowing bits. 


Lastly, some variations. These will be used in various contexts depending on the size of the image, both as logos or as icons.

That's about it, at the moment I'm pretty happy with how it turned out. I'll give it a rest over the weekend and look at it again with fresh eyes on Monday. If I still think it's ok, I'll go through my portfolio and update all the images to contain the new logo.

Last but not least , if you have any comments, suggestions or critiques on this logo I'd be happy to hear them, I'm eager to up my game in logo design!

Maya Mel Script: vrnDivCon

General / 13 February 2018

Here is a step by step tutorial on how to install and run my vrnAutoMap.mel script, which you can download for free from Gumroad:

https://gum.co/vrnDivCon

This is a contextual script that allows accessing the Connect Tool, Divide Edge and Poke Face with a single hotkey/command based on current poly component selection.

INSTALLATION:

1. Download the file from Gumroad, open the archive.

2. Copy "vrnAutoMap.mel" to My Documents/maya/<version>/scripts

Just replace <version> with your version of Maya. This was tested with 2016.5, 2017 and 2018, previous versions might not work.

3. If you plan on using this as a shelf button, feel free to copy the icon "vrnDivCon.png" to My Documents/maya/<version>/prefs/icons

4'. Restart Maya
or
4". Type this in the Script Editor and press the numpad Enter button:

rehash

WHAT THE SCRIPT DOES:

In calls the Connect Tool, Divide Edge or Poke Face based on current poly component selection, as follows:

1. Single vertex: converts to edges and calls Connect Tool.

Very useful for those pesky cylinder end caps. Insert Edge Loop or Multi Cut do not work on them since there are no loops. The regular Connect Tool works nice but it requires the edges to be selected. Just avoid Maya's shortcomings by using vrnDivCon


2. Multiple vertices: connects components and softens the newly created edges  with an angle of 60 degrees.

This is because the default polyConnectComponents command creates hard edges by default :(


3. Single edge: Calls Add Division to Edge command. 

This allows the user to Middle Click Drag to change the number of inserted vertices. To aid the preview process, the script also puts the mesh into vertex component mode to allow visual feedback on the number of vertices added, something that Maya does not do by default.


4. Multiple edges/faces/multi-selection: Calls Connect Tool. Pretty self explanatory.


5. Single Face: Calls Poke Face.

Desert Eagle L5 .357 for sale!

News / 08 February 2018

I decided that it might be a good idea to put some of my 3d models up for sale.

First one is the Desert Eagle L5 .357 which can be bought from either Artation Marketplace, Sketchfab or Gumroad. Both versions are identical in contents and pricing.

It's suitable for use in FPS games as a 1st person view model or as a presentation model. It includes all the files needed to modify/bake/texture the object and create variations.

Technical summary:

High poly model: 40k triangles without smooth applied.

Low poly model: 13k triangles.  All parts required for shooting and reload animations are modeled.

*Simple animation of moving parts provided.

UVs: 1 UV channel packed with proper spacing for a single 4k texture set.

PBR Metallic Roughness 4k texture set created in Substance Painter 2017.

Download contents:

1 .Maya ASCII (2018) scene containing high poly, low poly and basic animated version.

2. FBX files:

* deagle_high.fbx : high poly (without smooth). Can be imported into other 3d programs that support creases or hard edges/smoothing groups can be used as bevels/creases.

* deagle_low.fbx : low poly with smoothing groups, low poly with basic "explode" animation.

* deagle_anim.fbx: low poly with smoothing groups and basic animation

* deagle.fbx: bake file loaded in Toolbag, contains low and collapsed high separated and exploded.

3. deagle.tbscene: Marmoset Toolbag 3 scene used for baking.

4. deagle.spp: Substance Painter 2017 file.

5. glTF directory with glTF model/PBR textures exported from Substance Painter.

PS: If you'd like any other formats, let me know and I can include them in the download.


Maya Mel Quick UVs Script: vrnAutoMap

General / 19 January 2018

Here is a step by step tutorial on how to install and run my vrnAutoMap.mel script, which you can download for free from Gumroad:

https://gum.co/vrnAutoMap

In short, the script automatically creates oriented UVs for the selected meshes and a UV layout for all the objects in the current selection for a single texture sheet. 

INSTALLATION:

1. Download the file from Gumroad, open the archive.

2. Copy "vrnAutoMap.mel" to My Documents/maya/<version>/scripts

Just replace <version> with your version of Maya. This was tested with 2017 and 2018, previous versions might lack some features and will probably not work.

3. If you plan on using this as a shelf button, feel free to copy the icon "vrnAutoMap.png" to My Documents/maya/<version>/prefs/icons

4'. Restart Maya
or
4". Type this in the Script Editor and press the numpad Enter button:

rehash

WHAT THE SCRIPT DOES:

1. Flattens the object with a Planar Projection on the current UV set.

2. All hard edges are converted to UV cuts.

3. Unfolds everything selected.

4. Orients all selected UV shells (Requires Maya 2017 Update 4 or newer)

5. Applies Layout UVs.

USAGE:

1. Select one or more meshes.

2. Type this command in the Script Editor and press the numpad Enter key:

vrnAutoMap(0,0,0);

3. Since the script uses the u3dAutoSeam command to cut the UV shells and ensure a proper unwrap, the results might need some tweaking. For example, here are some resulting UV shells that will require tweaking as follows:


a. Unnecessary UV cut. Just sew it:


b. Two other UV cuts that also result in a broken UV shell. Sew these together and then Unfold and Orient the new shell:


c. After fixing everything, select all objects/UV shells and re-apply the Layout UVs. Any changes you make to the Layout UV Options will be remembered next time you run vrnAutoMap:


OPTIONAL/ALTERNATIVE USAGE:

1.Custom UV cuts:

If you are not happy with the way "Auto Seam" chooses the UV cuts you can specify your own edges to be cut in UVs. To do this make sure you have the edges you would like vrnAutoMap to cut. This is very helpful when doing UVs for cylinders type meshes, for example hoses, in which case you might want to control where the cut along the cylinder goes.

2. Quick Soft/Hard edge:

If your mesh does not have proper soft/hard edges and you also want to let vrnAutoMap set them automatically, use this command:

vrnAutoMap(1,0,0)

This will open up a simple input dialogue that takes in an angle (default: 55) and applies soft/hard edges accordingly before running the UV part of the script.

CUSTOM USAGE:

The function can tweaked with these three arguments:

vrnAutoMap(x,y,z) replace x, y, z as follows:

x:First argument controls how soft/hard edges are handled.

x=0

    Script will use existing soft/hard edges. $angle is ignored. 

x=1

    Script will add soft/hard edges by $angle from a "promptDialog". Default value is 55 degrees.

    Use this if your mesh does not have soft/hard edges.

        Pro Tip: After running this use the new "3D Cut and Sew UV Tool" in Maya 2018 to cut, sew and unfold

        any remaining issues with your mesh. Make sure to check out the tool options to check out the specific

        shortcuts for this tool!

y: Second argument controls the texel resolution of the final pack in px/Unit as available in the UV Toolkit

y=0

    Script will ignore map size and will pack everything and fill the 0-1 UV space.

y<>0

    Will scale all shells to desired texel density and then pack to the lower left side of the 0-1 UV space.

z: Last argument is the map size, as available in the UV Toolkit. If y=0, this is ignored.

    Otherwise set as desired, preferably a power of 2.

Marking Menus in Maya. Part 3: Customizing

Tutorial / 07 January 2018

Initially I planned on going through creating a regular marking menu from scratch and then move on to customizing the default marking menus, you know the semi-secret stuff not really documented by Autodesk. The first version of this blog post was waaay to long so I decided to just skip the first part and go straight to the sweet super secret tips and tricks 😉

So if you’re looking for a tutorial on how to use the default Marking Menu Editor, look no further than the official Maya help.

If you're new to my series, you can check Part 1 and Part 2 for more insight into Maya's marking menu system.

Disclaimer: This post is a bit more advanced than the previous parts so Mel experience is required as I do not plan on explaining Mel basics here. The specifics apply to Maya 2018 as previous versions have different ways of handling the customization.

Background information:

Around 2013 Autodesk started implemented contextual marking menus in Maya (see Part 2 for details). I really liked them so I decided to ditch my entire sweet custom marking menu system I had until that point and learn the defaults. I figured that this will allow me to mode easily adjust to new features added by each Maya version without having to redo my marking menus.

User Defined Context Marking Menus:

All in all, it was a good decision, yet I always felt some things were missing. While searching for how to customize these marking menus I found them all to reside here:

C:\Program Files\Autodesk\Maya2018\scripts\others

All contextual marking menus consist of two mel scripts, their names always start with “context”.

Most of them are commented properly so you can deduce a lot of their functionality by just reading them 😉


Let’s take for example contextPolyToolsDefaultMM.mel

There is also a companion script for each one which has a very similar name except the “.res”:  contextPolyToolsDefaultMM.res.mel. This script contains the display text for each command, they did this for localization purposes. So for example if you set up Maya’s interface to use something else other than English, it will load the .res files from a different location. The commands will remain untouched, only the display text will change.

This creates the default SHIFT+RMB marking menu when nothing is selected.

While exploring previous versions I found that most context* scripts have this at the end:

if (`exists contextPolyToolsDefaultUserMM`)
contextPolyToolsDefaultUserMM $parent;

This loads a user generated mel file (contextPolyToolsDefaultUserMM.mel) which can be used to modify the default one. This is very helpful since these script files change from version to version and having your customizations as separate files makes upgrading from one Maya version to another a lot simpler.

Now depending on version, this code might reside in different places:

  1. For Maya 2018 all the *UserMM are loaded by a single file: contextToolsMM.mel At this moment some of this functionality is broken (a bug probably). Scroll down to “If all all else fails:” category for a simple work-around.
  2. For Maya 2017 and older, each *UserMM file is loaded its corresponding default file. For our example this is: contextPolyToolsDefaultMM.mel

In simple terms, if you want to create your own “extension”, just create your own *UserMM file and copy the name of the default file and add “User” before “MM”. You can avoid loosing these files by updating to a new Maya version or un-installing by placing them in the user script directory, usually:

My Documents\maya\2018\scripts

All you have to do is to copy the original file, being careful to change the name of it and of the global procedure to match the mel file. If you do this and the procedure name matches the file name and the file is in the scripts folder, Maya will source it automatically.


Examples:

The first example inserts a new command (2) at the top of the south extension of the original marking menu (1):


contextPolyToolsDefaultUserMM.mel

global proc contextPolyToolsDefaultUserMM( string $parent )
{
            if (`popupMenu -query -exists $parent`){
            popupMenu -edit $parent;
                                    menuItem
                                                -label (uiRes("m_contextPolyToolsDefaultUserMM.k2DPanZoom"))
                                                -command "panZoomCtx -e -zoomMode PanZoomContext;setToolTo PanZoomContext;"
                                                -image "PanZoom.png" 
                                                -ia ""                                       
                                                ;
                                    setParent -menu $parent;
            }
}

The companion script looks like this:

contextPolyToolsDefaultUserMM.res.mel

displayString -replace -value "2D Pan/Zoom" m_contextPolyToolsDefaultUserMM.k2DPanZoom;

Each item in the marking menu item is defined with the menuItem command. If you read the documentation, you’ll notice this command returns an ID but the default implementation in Maya does not use this functionality and relies on creating and destroying new IDs on each call of the marking menu, sorting being done by creating each item one at a time.

This is worth mentioning since this seriously reduces the usage of the -ia (insert after) flag. There is no way of controlling where your custom button gets inserted since by default you don’t know which ID you want to “insert after”. Setting this to ” (NULL) inserts the command at the top of the marking menu.

The -label flag uses the uiRes command which reads the display text from the m_contextPolyToolsDefaultUserMM.k2DPanZoom variable. This is set up by the .res file mentioned previously, the structure should be easily recognizable from my example so I won’t go into the details since you can replace this whole label with a simple: 

-label “2D Pan/Zoom"

 and skip the whole localization file altogether.

The second example will overwrite a menuItem in the radial part of the face marking menu.

 contextPolyToolsFaceUserMM.mel

 global proc contextPolyToolsFaceUserMM( string $parent )
{
            if (`popupMenu -query -exists $parent`){
            popupMenu -edit $parent;
                                    menuItem
                                                -ia ""
                                                -label (uiRes("m_contextPolyToolsFaceUserMM.kDeleteFace"))
                                                -command "doDelete"
                                                -radialPosition "SW" 
                                                -enableCommandRepeat 1
                                                -image "polyDelFacet.png"
                                    setParent -menu $parent;
                                   
            }
}

Some of you will notice there are a few more changes in the image which are not reflected in the code above, I’ve chosen to only show one item for the sake of simplicity.

Usually we would use the -e (edit) flag to edit an already existing item but as I’ve mentioned before, there’s no easy way of obtaining the ID of the original without complicating matters too much so the trick I’ve found is using -ia “” flag which makes the item be recreated at the “beginning”, practically overwriting the item that was initially created in the original mel file.

Last but not least, the -radialPosition flag defines the position of the newly created item.

For more details, here’s the help for menuItem.

If all else fails:

As previously mentioned, Maya 2018 might be bugged so you might find that even if you named your *UserMM files properly, they don’t get automatically sourced and they don’t’ work. To go around this we can edit this file:

My Documents\maya\2018\scripts\userSetup.mel

This gets run at every Maya start so we can add a command to source the context files and make sure they work. Since I’m a bit of a neat freak (if that wasn’t clear from the whole .res thing above), I don’t actually load each context mel here, but instead use this line:

source userContextMenus;

..to source userContextMenus.mel which looks like this:

source contextPolyToolsDefaultUserMM.mel;
source contextPolyToolsDefaultUserMM.res.mel;
source contextPolyToolsEdgeUserMM.mel;
source contextPolyToolsEdgeUserMM.res.mel;
source contextPolyToolsFaceUserMM.mel;
source contextPolyToolsFaceUserMM.res.mel;
source contextPolyToolsObjectUserMM.mel;
source contextPolyToolsObjectUserMM.res.mel;
source contextPolyToolsVertexUserMM.mel;
source contextPolyToolsVertexUserMM.res.mel;
source contextUVToolsEdgeUserMM.mel;
source contextUVToolsEdgeUserMM.res.mel;
source contextUVToolsFaceUserMM.mel;
source contextUVToolsFaceUserMM.res.mel;
source contextUVToolsUVUserMM.mel;
source contextUVToolsUVUserMM.res.mel;

 You guessed it, it sources a file that sources some files! Why is that? Well, I guess Autodesk will fix the loading bug at some point so all I have to do is delete this file (userContextMenus.mel) and the line from userSetup.mel call it a day.

You could also use the code above to identify the context marking menus that can be customized and search their corresponding defaults in the Maya installation directory.

Marking Menus in Maya. Part 2: The Defaults

Tutorial / 07 January 2018

In Part 1 we covered the basics of how marking menus work. In this part we'll cover how they integrate in Maya's UI and UX. There are some interesting things here so even if you've used them before, I would recommend giving this a good read as it might help you better understand the philosophy behind marking menus.

Here’s a quick run though of their main characteristics:

Marking Menus are cursor-centered.

Marking Menus allow access to more commands with less shortcuts.

Marking Menus are muscle-memory based.

This will come in handy when we move to Part 3 and customize them. The default marking menus I will be referencing all revolve around polygon modeling but as you will see, they also apply to other areas of Maya.

To make it easier to list shortcuts, they will be marked in bold italic text I will use the following notation for buttons.

SHIFT - the shift key

CTRL - the control key

ALT - the alt key

LMB - left mouse button

MMB - middle mouse button

RMB - right mouse button

(N), (S), (SE), etc - the direction of the command where applicable.

All marking menus are visible for as long as the mouse button in the combo is pressed. It is therefore implied that the mouse button has to be held pressed for the marking menu to be visible.

Shortcut consistency across the interface.

We'll start off with a bit of a tangent about the mouse buttons in Maya.

By default, LMB is a selection button, MMB is an action button and RMB is a marking menu button. All the default marking menus use the RMB but as you will see in Part 3, that doesn't have to be the case for all custom marking menus. This default mouse behavior carries across the entire interface which means that for example text selection is done with LMB but drag and dropping is done with MMB. This might look a bit heavy-handed for first time users but it's just the result of keeping things consistent. As a side note, the LMB can be used as an action button but when clicking on (i.e. selecting) a control, such as one of the axis of the move manipulator tool. This does not contradict the philosophy, it's merely a shortcut.

Still, even some more advanced users have trouble understanding why the separation between these two.

 Here's an example of using the manipulator tool to move an object that is just off-screen, so the user cannot click and drag on the manipulator itself. But you can select an axis then reposition the camera and then click and drag MMB to move the object along the selected axis.

The lesson here is that Maya's UI/UX quirks are a result of careful design and years of evolution. As you will see going forward, this design process and the amount of thought put into the UI/UX will become more evident.

Default Marking Menus are contextual.

That’s how they're referred to in the help: contextual marking menus.

I will demonstrate the most basic and universal marking menus which are almost all you need to remember if you plan on do 3d modeling in Maya. I am not exaggerating this one bit.

Let's start with the most basic marking menu:

  • RMB

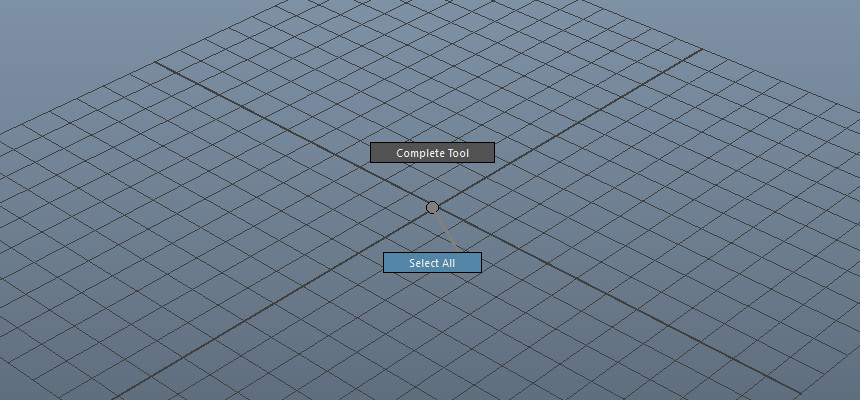
That’s easy! Just click and hold the RMB. Doing this on elements of the interface will pop up a regular context menu but holding RMB in the viewport will create this marking menu:

It doesn't look like much since there's nothing under the mouse cursor. It is worth mentioning that there are two very useful commands here: Select All and Complete Tool which are very helpful. So, every time the user needs to select all objects in a scene, this can be accomplished with a simple RMB flick in the S direction with the mouse over an empty space in the 3d scene. Same thing about completing a tool such as Multi-Cut.

The contextual part kicks in when the user holds RMB over an object, in which case the component marking menu pops up.  This menu differs based on the selection or the type of object the mouse cursor is over. Here are two examples, for meshes and NURBS surfaces respectively:

Marking Menus are ergonomic.

Of course, you could use the F8 to F12 keys to switch between object mode and each component mode. But there’s a catch, doing so means you have to lift either the left or the right hand from their regular resting places: the left of the keyboard and the mouse, respectively.  This decreases speed and increases fatigue.

Maya’s default interaction system is very ergonomic, the most important keyboard shortcuts are all concentrated on the left side of the keyboard, so the user won’t have to move the left hand too much to reach them. Similarly, marking menus allow the user to bring menus to the cursor, minimizing the movement of the right hand.

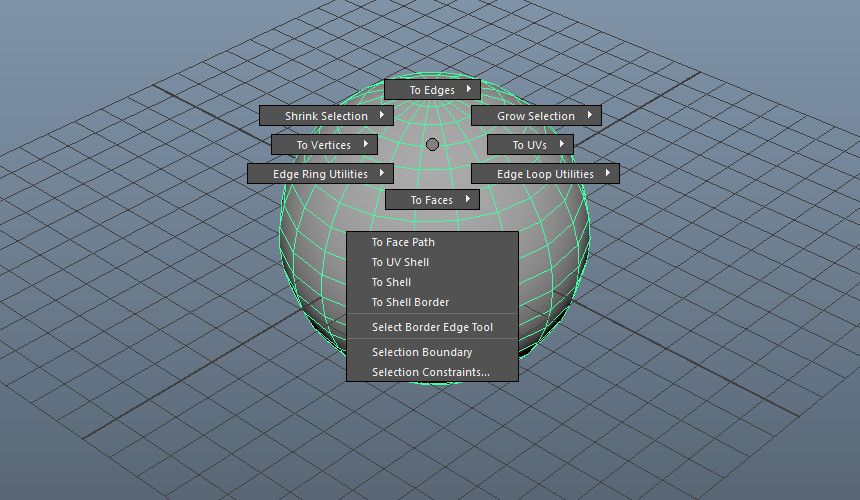
Next up, working with selections: selecting loops, rings, converting selections, all can be done from this marking menu:

  • CTRL+RMB

This one is pretty much self-explanatory as far as content goes, yet it’s very important to note the position of each type of component conversion, like the positions in the component marking menu (RMB): (W) is for vertices, (N) for edges, (E) for UVs, (S) for faces.

As mentioned in Part 1, marking menus are muscle memory based, so having similar commands in similar directions of different marking menus makes learning them easier.

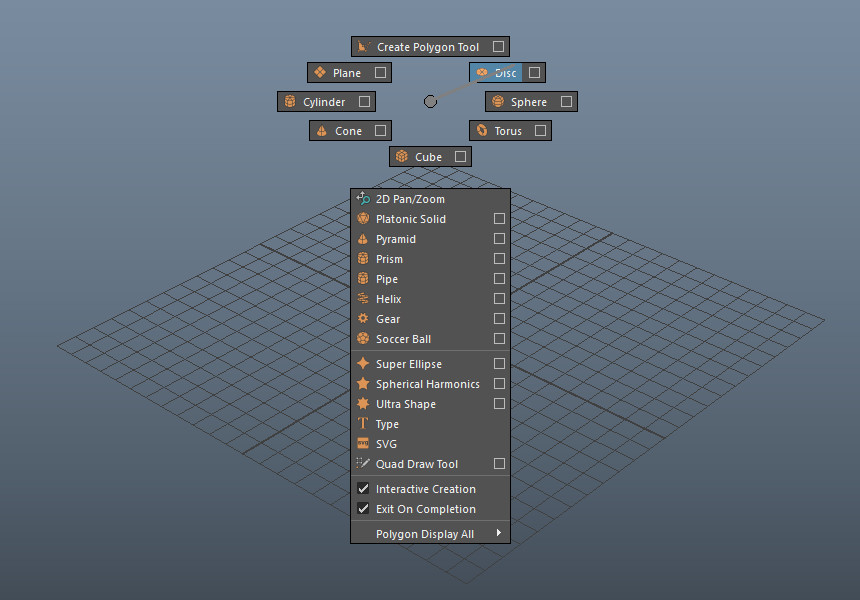
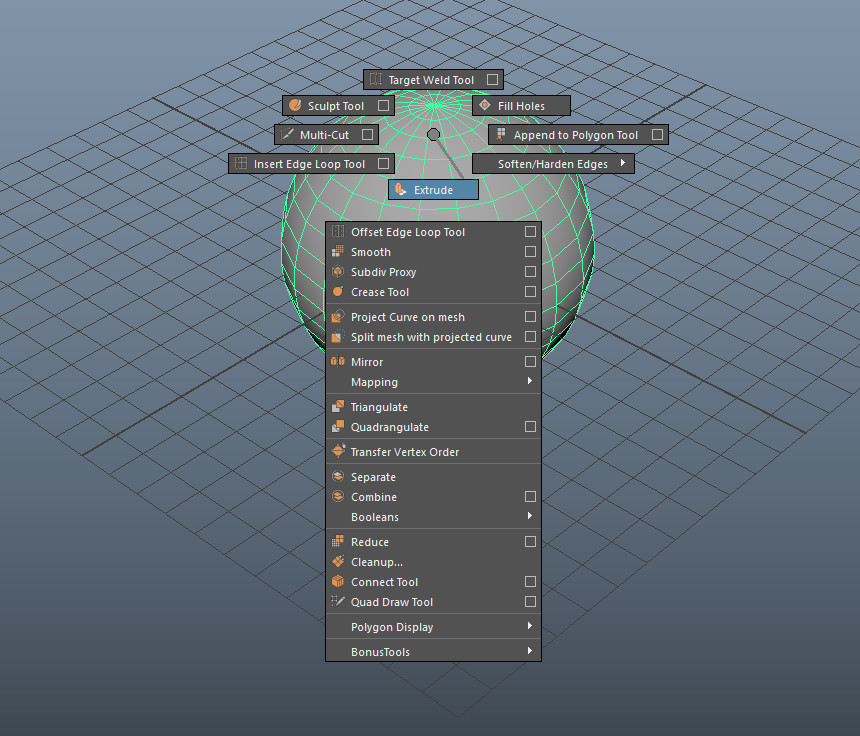
Next up, accessing tools and commands, they can be accessed from this marking menu:

  • SHIFT+RMB

This marking menu pulls out all the tricks to accommodate almost all tools and commands related to polygonal modeling.

First off, this menu is different depending on the object the mouse is over or it’s component selection mode.

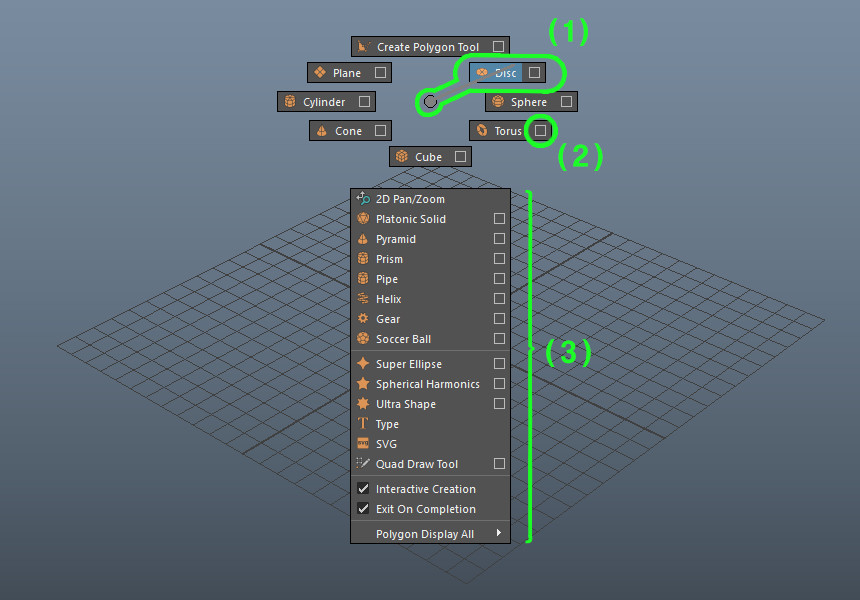
If there’s nothing under the mouse cursor, the menu contains commands and tools to create geometry from scratch: primitives, the Create Polygon Tool, etc. See the image above.

For polygon meshes in object selection mode, it contains:

And for component mode, here are the default menus for each component:

You can also observe the same consistency in direction, for example the Extrude command is always in the (S) direction for vertices, edges and faces.

  • CTRL+SHIFT+RMB

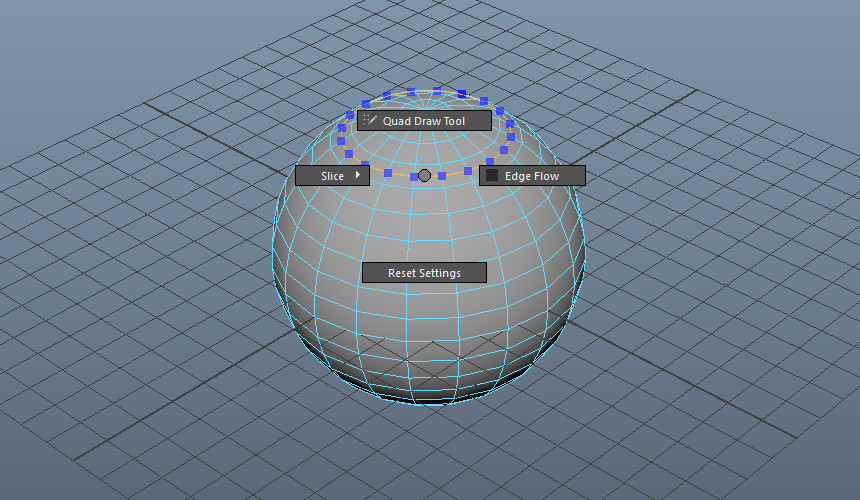
This one is a bit more obscure but it’s a universal marking menu that houses the settings for the current tool. For example, if you’re using the Move Tool or Multi-Cut or Extrude you can access its settings without having to go searching for buttons or open new windows.

The reason I mention these four marking menus is that you don’t need a cheat sheet to remember them, all you need is the RMB and the good old modifier keys CTRL and SHIFT.

The analogy I use is working in Maya is like playing the violin while working in a program like 3d Max is like playing the piano or the drums if you get angry at the keyboard.


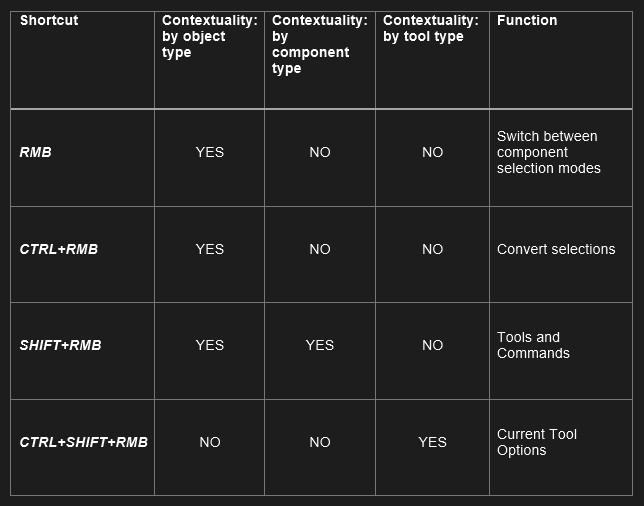
As a recap, here’s an easy table of these marking menus and what they do:


In Part 3 we’ll discuss creating custom marking menus from scratch as well as modifying the default marking menus.

Maya Quick Tip: Press and Release Hotkeys

Tutorial / 04 January 2018

One of Maya's cool features is the ability to assign different commands for pressing and releasing a key or key combo.

This feature is used by all marking menus: pressing the key will generate the menu, releasing it will destroy it.

We can take advantage of this feature and create some cool scripts. For example we can create a selection filter using the inbuilt polySelectConstraint command. This is usually available through the interface in the top menus under Select->Select Constraints... Unfortunately the design of the window that houses the commands is a bit confusing as it changes based on current selection. In needs a lot of clicks even for a simple operation such as selecting hard edges.

I've found myself using the hard edge filter a lot. I've also used Select Constraints to select planar or near-planar faces so I decided to just go ahead and create a hotkey that would activate these filters based on current component selection. Really, why should contextual behavior be limited to marking menus?

Create a new hotkey and after setting you desired shortcut for it, make sure it's set to "On Press" by clicking the small triangle at the right of the text box:

Use the following code for the shortcut:

//While hotkey is pressed, check selection mode:
//If edge mode -> filter by hard edge
if (`selectType -q -pe` == 1){
polySelectConstraint -m 1 -t 0x8000 -sm 1;
}
//If face mode -> filter by face angle. Adjust -at attribute as desired.
else if (`selectType -q -pf` == 1){
polySelectConstraint -ap 1 -at 5;
}
//End

Similarly, create a new hotkey, use the same key but set it to "On Release". For the command, use this code:

//When hotkey is released, check selection mode:
//If edge mode -> revert edge constraing mode
if (`selectType -q -pe` == 1){
polySelectConstraint -sm 0;
}
//If face mode -> revert face constraing mode
else if (`selectType -q -pf` == 1){
polySelectConstraint -ap 0;
}
//End

PS: I found that using resetting all constraints is buggy sometimes so for the release part it's more reliable to revert each constraint as needed.

Marking Menus in Maya. Part 1: The Basics

Tutorial / 04 January 2018

If you know Maya, you've probably used marking menus before. If not, you've probably heard Maya users mentioning them every time they want to prove you Maya's superiority (Maya Master Race FTW). Other programs might have something similar, but Maya still has the edge due to usability and customization options. This is a three-part series that will take you through the marking menu system in Maya.

Part 1 (this one) will cover the basics. If you're either a Maya beginner trying to make sense of them or you don't use Maya but want to know what the fuss is about, this is for you!

Part 2 will cover the default marking menus and how to use them properly. If you want to master the marking menus and never use the regular interface again, this is the article to read.

Part 3 will cover creating marking menus from scratch or editing the default marking menus using some features that are not properly documented in Maya's help. I will share my mel files with everyone, so you can edit your own marking menus.

Disclaimer: All through-out these articles I will be referencing Maya 2018 marking menus. Most will apply to previous versions as well but expect bigger differences the older your preferred Maya version is. In the future I will write an article about Maya versions and why it’s probably better stay up-to-date.

Marking Menus are cursor-centered.

Marking menus are radial menus that exist in the interface only for the duration of hotkey combination being pressed. This hotkey combination usually consists of a keyboard key and a mouse button pressed. They're always created where the mouse cursor is so they effectively bring the interface to the mouse cursor, the focus point of every 3d modeling app. They're very similar to mouse gestures first introduced in the Opera browser a few years back.

In the old school windows-style graphics UI, the user has to remember button positions in the interface and navigate them like a librarian searching for a book. Marking menus transforms this by bringing all the buttons to your fingertips, look at it like some sort of visual Google for the UI.

Marking Menus allow access to more commands with less shortcuts.

The only apparent downside for beginners is the steep learning curve due to their unusual interaction model. They look pretty daunting at first with all of those buttons crammed in that unusual radial pattern. From my experience with Maya both as an artist and as a teacher, I can promise that the steep learning curve pays off very fast, as marking menus takes out the hassle of remembering a lot of keyboard shortcuts. We're talking fractions of seconds here but in time they add up to a lot. Being able to quickly access commands means you can do more in less time, make more mistakes and learn faster!

Marking Menus are muscle-memory based.

Each marking menu allows the user to access 8 commands by flicking the mouse in their direction. These are marked by their geographical direction: N for north, NE for north-east and so on. There is no need to click these areas, releasing the mouse button will automatically activate the button in that direction. (See (1) in the image above)

There are also option boxes for some commands as well as an extension in the south direction which allows access to several commands which all have to be precisely activated. (2) and (3) respectively in the image above.

Beyond they cold hard efficiency, marking menus evolve with the artist. A beginner can take their time, activate a marking menu and visually choose the button they want to press. Once muscle memory starts building up, the marking menu items can be activated and with only a flick in the right direction, making them blistering fast, so fast that they’re barely visible on the screen. This makes working with Maya's interface like playing a musical instrument where hitting all the right notes becomes second nature after a while without having to concentrate on the movements or visually aiming for each string/drum/key.

These would be the basics, next up we'll go through how marking menus are integrated into the Maya UI/UX. Click here for Part 2.

Free 3d models (Sketchfab, CC Attribution)

General / 28 December 2017

To kick things off what I hope will be a periodically updated 3d graphics related blog, I've decided to share some of my Sketchfab models under the CC Attribution license. Basically, you're free to use them in your own projects, commercial or not as long as you credit me for it. I would appreciate if you use this link if you do: www.vrntech.ro

A Futuristic Truck concept I built more than 10 years ago while learning Maya's Subdivision surface workflow. 

An Antelope chair I made for my sister's Interior Design projects. Here you'll find a very used version of it with some quick Substance Painter textures.

Next up some low poly rims and tires I made for an Asseto Corsa mod a couple of years ago. I don't think it ever got released so here are two Nessen forged rims and two slightly used tires.

Last but not least, a rim of my own design, JDM style.

PS: If you need variations of these, let me know and I can make it happen!