2019 Hum3d Car Render Competition WIP Part 3

General / 08 October 2019

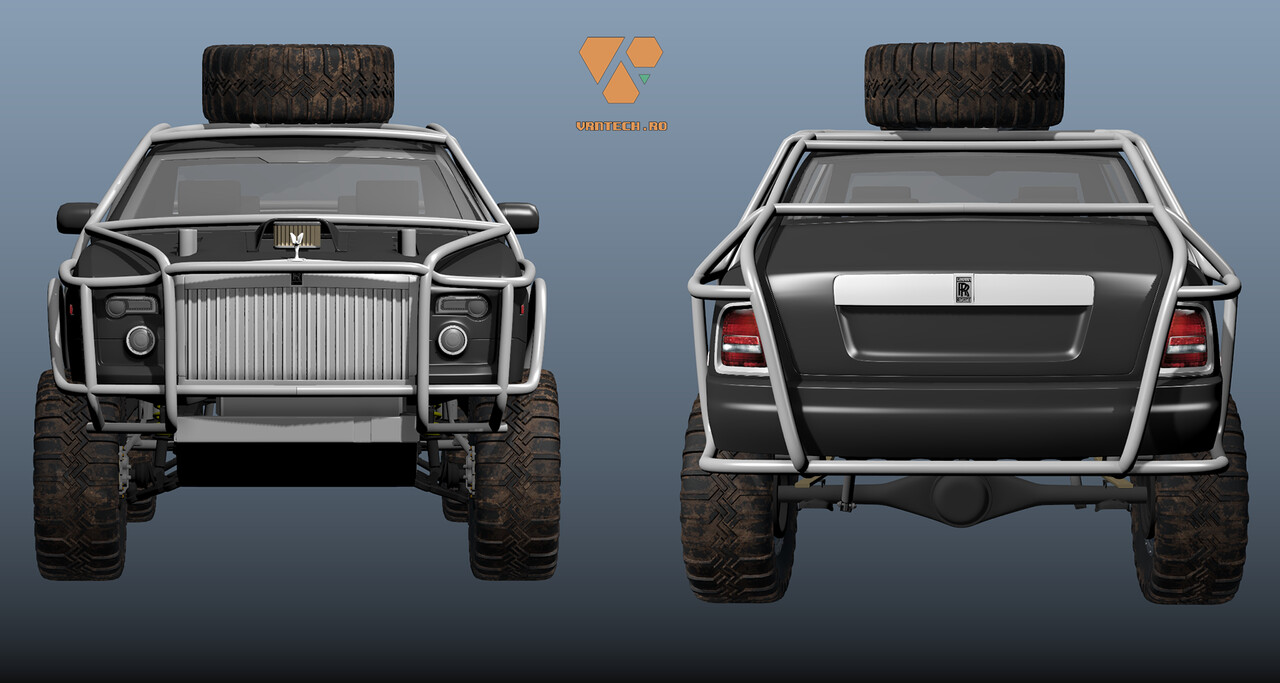
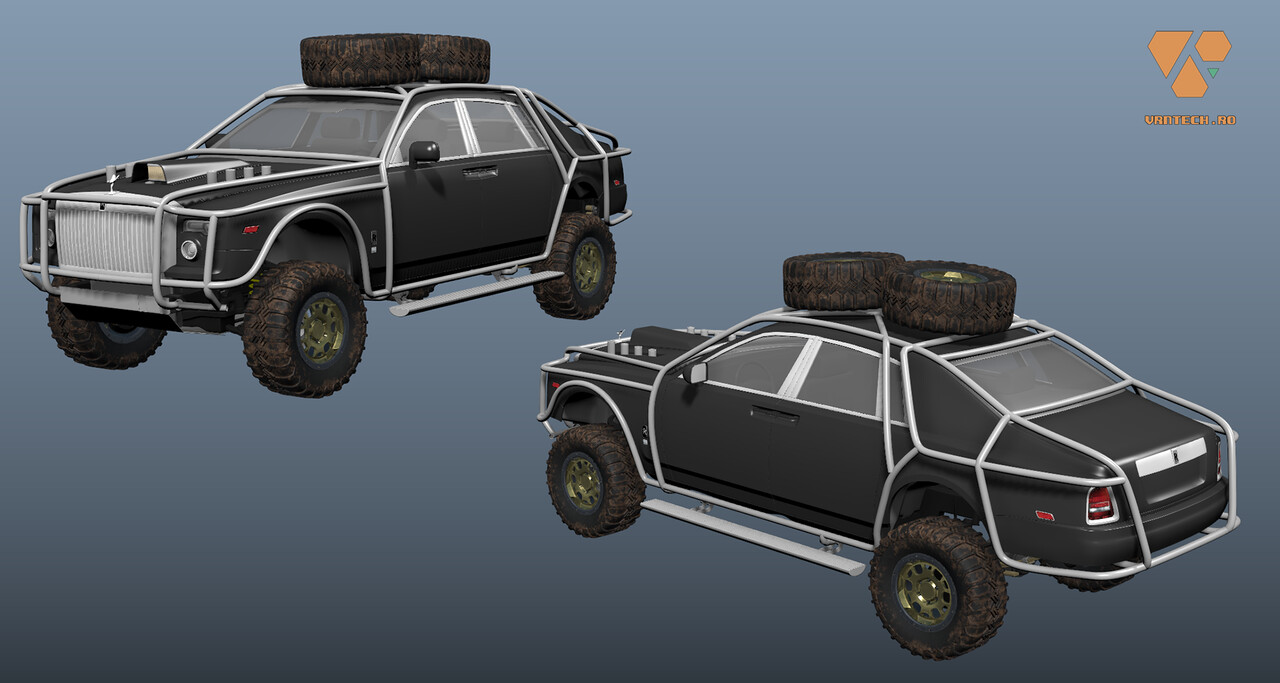
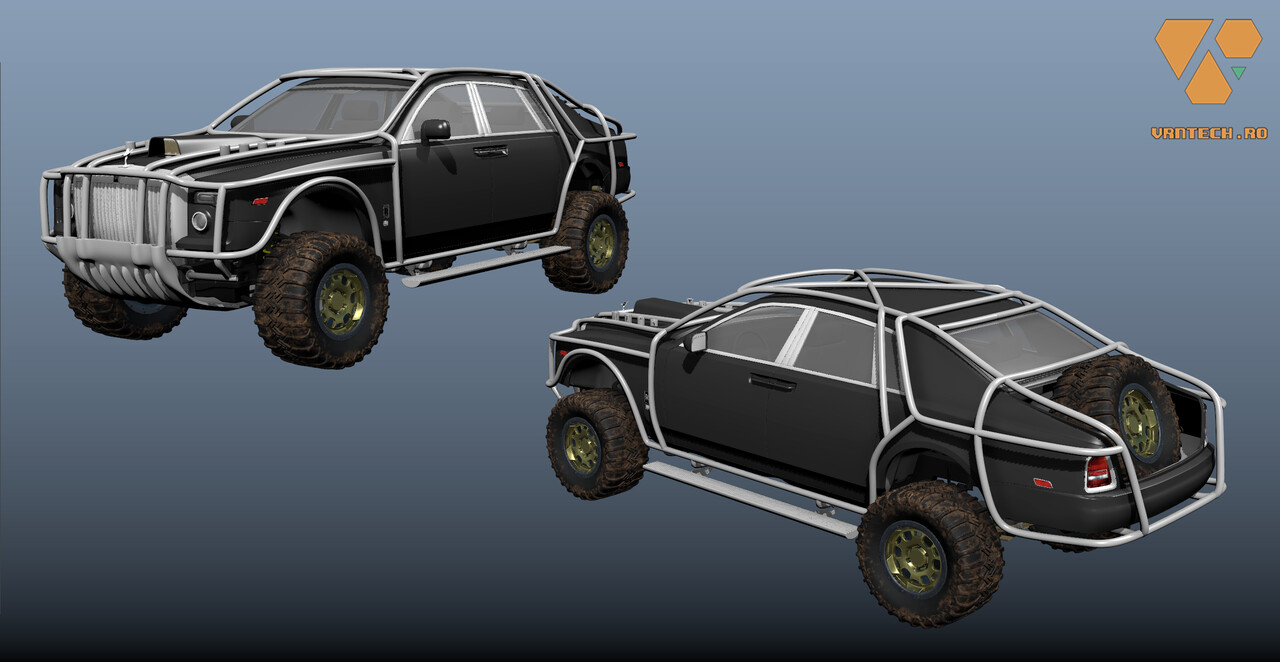
A quick post with the new exo-cage. I think this will be the final design.

I've also changed the engine skid-plate with something more realistic looking made from flat sheet-metal. The front part of the cage has also been simplified to allow the hood to open.

I've added two spare wheels on the roof, I feel like the trunk needed to be left alone, including the ability to be opened despite the cage.

Some of you might be wondering why an exo-cage on a desert truck, those are usually reserved for rock crawlers. Besides looking mighty cool on the Rolls, the cage does a lot to add versatility to the vehicle. So if the sheikh decides to go rock crawling or survive a zombie apocalypse, the car is a few simple changes away from these scenarios. It's not all about the bling!
PS: The chassis is a Toyota truck and the engine is an american V8, all very reliable and easy to fix.


2019 Hum3d Car Render Competition WIP Part 2

General / 27 September 2019

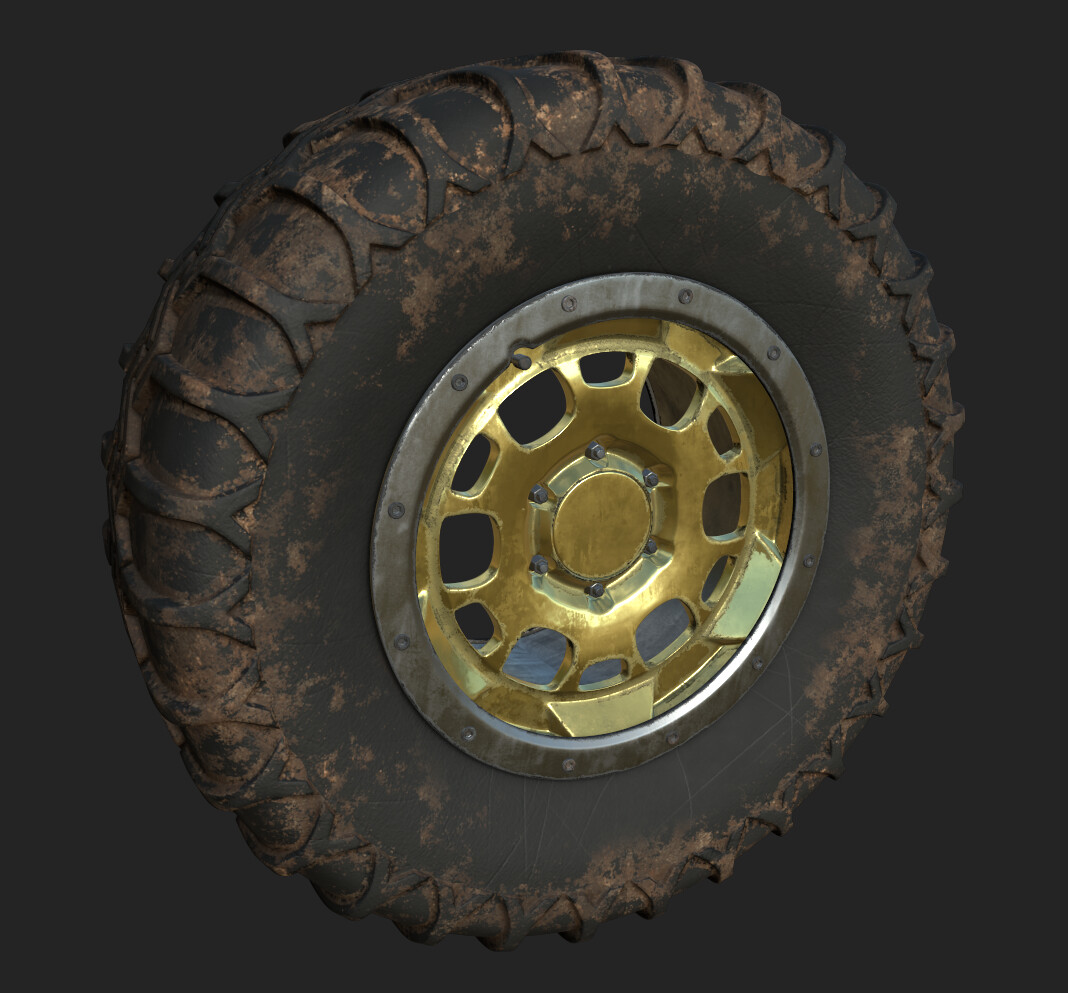
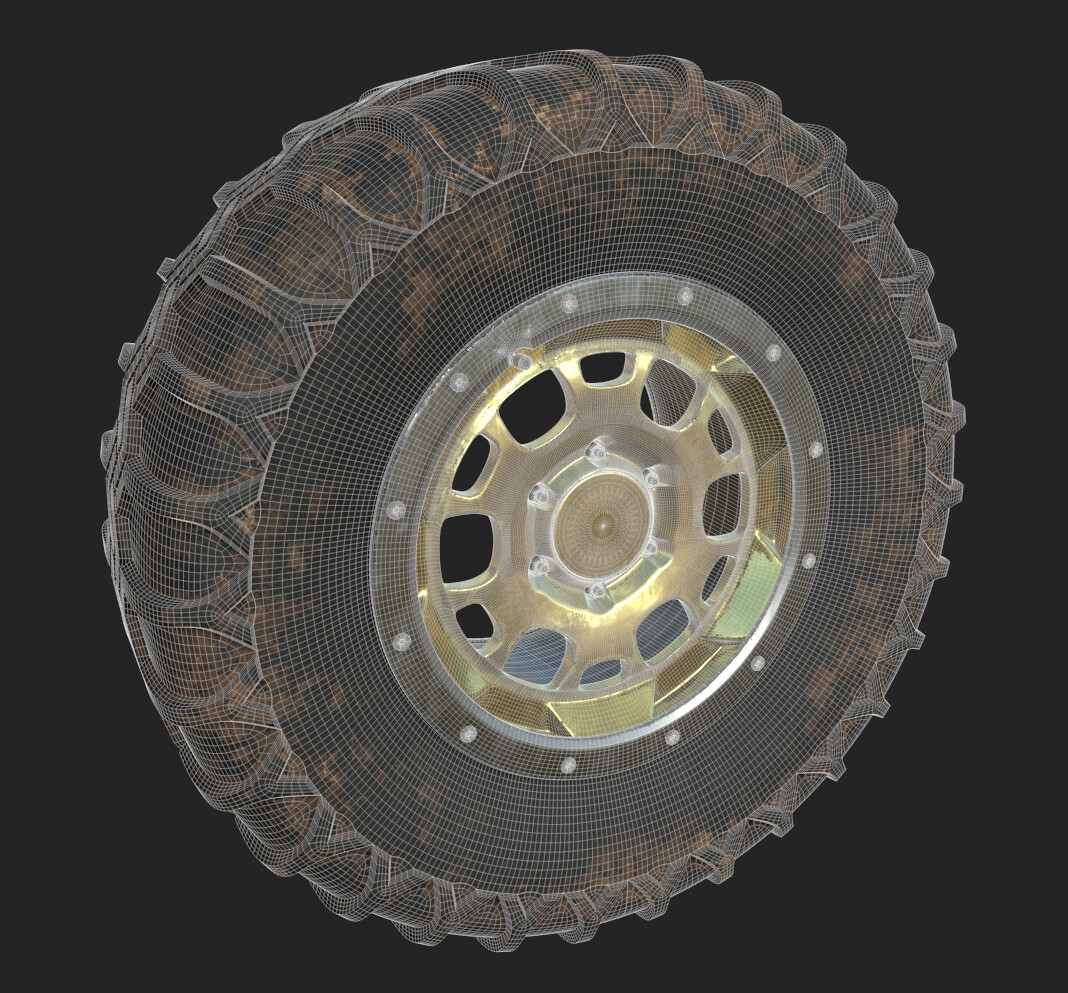
Just a quick update before the weekend. I've replaced the wheels with some real wheels and tires: Toyota TRD bead-lock rims with Desert Master tires. Texturing for these is just a quick pass with Painter presets, nothing final. I'll add the sidewall graphics and do another texturing pass then. The tire texture needs a lot more love before it starts looking decent.


I'm also playing around with the exo-cage. Below is take two, most likely not final as well. That side-step is something for the sheikh to get into the car, it's retractable to not impede ground clearance while jumping dunes!

I've removed the external fuel tanks and I'm still thinking whether to keep the trunk lid or have the spare visible like in the image below.


Sketchfab model updates: clearcoat and refraction.

General / 03 August 2018

Lately Sketchfab introduced a bunch of cool features like refraction and more recently a clear coat option. Since most of my stuff there benefits from it, I decided to give them all a nice fresh coat of paint.

Here are some of the highlights:

First off, my Dacia got a bit of an upgrade. The geometry got better bevels for better reflections and various tweaks. Texture and shader-wise, it has now got refraction and clear coat as well as an actual license plate.

My other Dacia has been brought up to date with refraction and clearcoat as well:

Now let's add some color into this post: the Chevelle, the Pickup got refraction and clearcoat as well. For these I've used a bit of a trick: the clearcoat uses a custom normal map, which is the clean bake from the high res model as well as a mask to separate the clearcoated areas from the dirt and rust. I did this to simplify the transitional areas between the clearcoated and non-clearcoated areas.


Maya Mel Script: vrnDivCon

General / 13 February 2018

Here is a step by step tutorial on how to install and run my vrnAutoMap.mel script, which you can download for free from Gumroad:

https://gum.co/vrnDivCon

This is a contextual script that allows accessing the Connect Tool, Divide Edge and Poke Face with a single hotkey/command based on current poly component selection.

INSTALLATION:

1. Download the file from Gumroad, open the archive.

2. Copy "vrnAutoMap.mel" to My Documents/maya/<version>/scripts

Just replace <version> with your version of Maya. This was tested with 2016.5, 2017 and 2018, previous versions might not work.

3. If you plan on using this as a shelf button, feel free to copy the icon "vrnDivCon.png" to My Documents/maya/<version>/prefs/icons

4'. Restart Maya
or
4". Type this in the Script Editor and press the numpad Enter button:

rehash

WHAT THE SCRIPT DOES:

In calls the Connect Tool, Divide Edge or Poke Face based on current poly component selection, as follows:

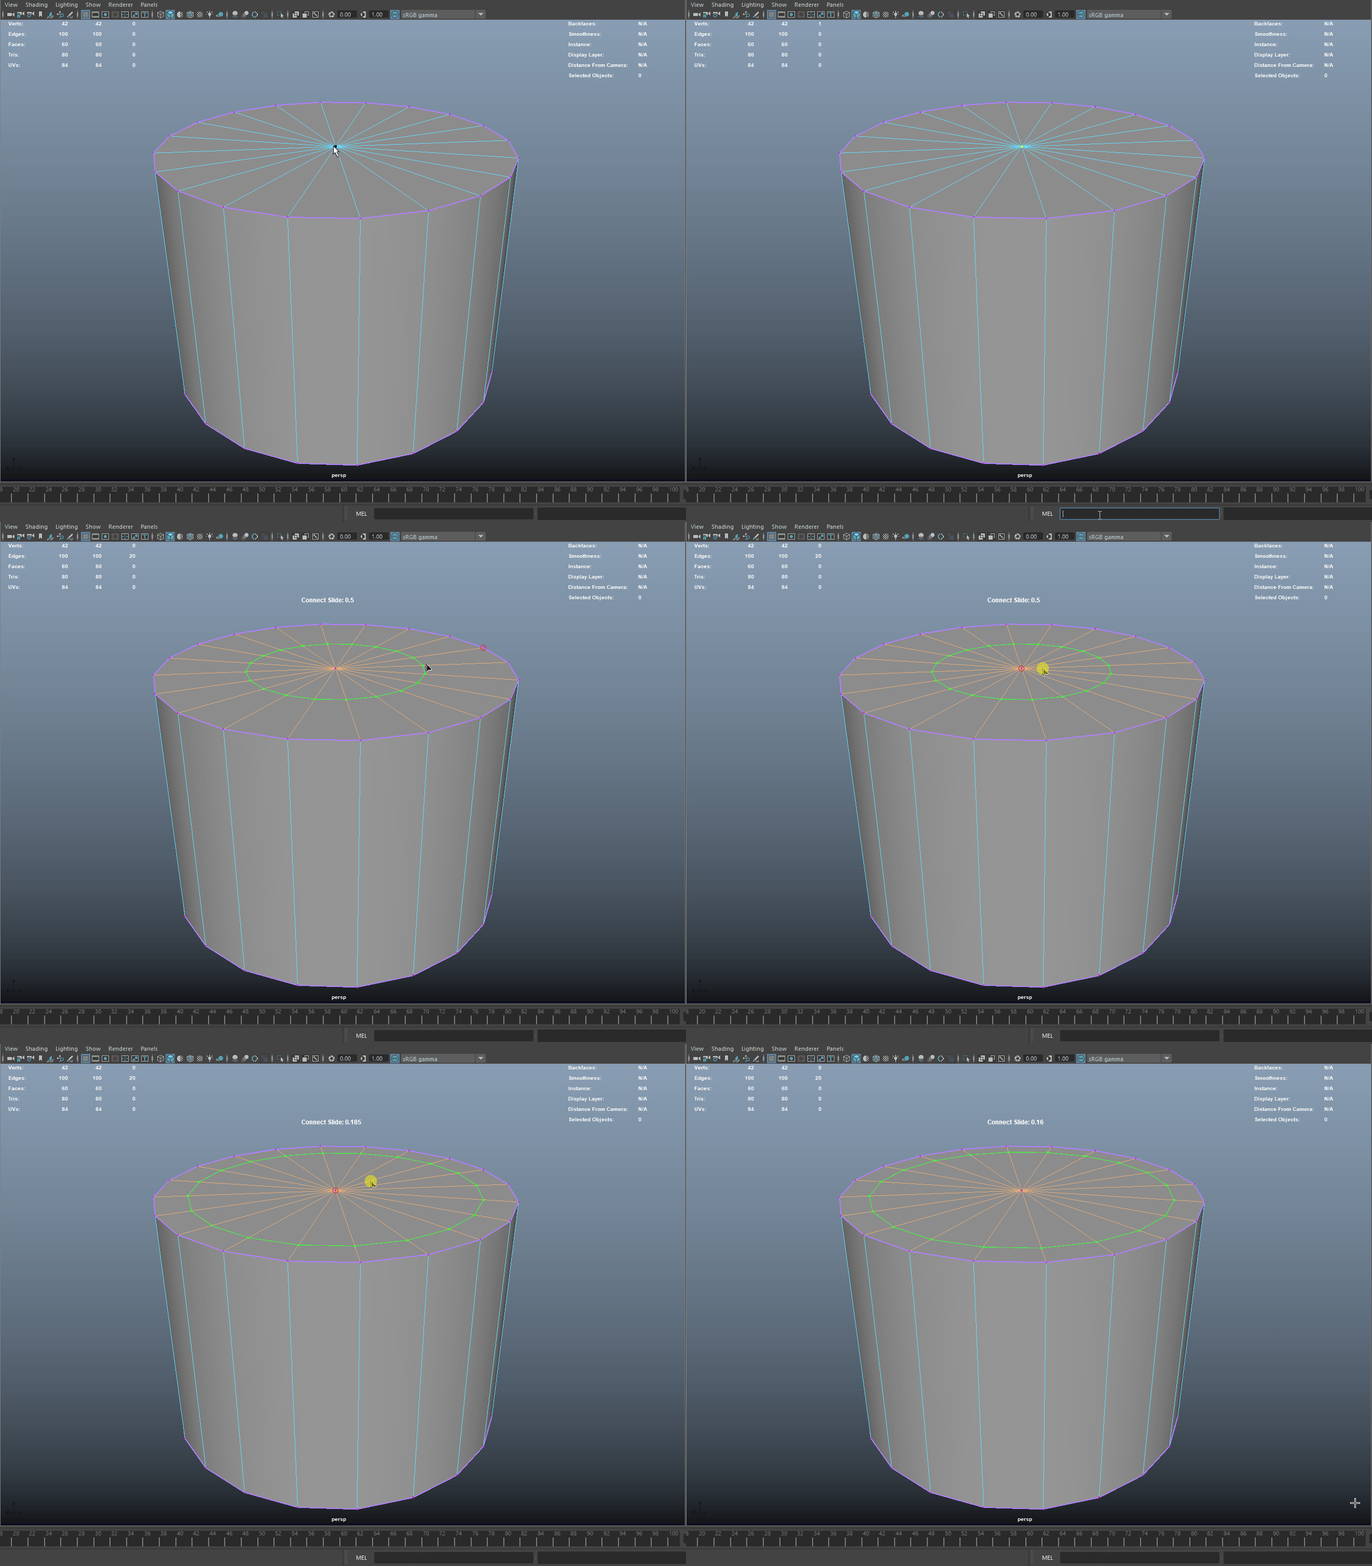
1. Single vertex: converts to edges and calls Connect Tool.

Very useful for those pesky cylinder end caps. Insert Edge Loop or Multi Cut do not work on them since there are no loops. The regular Connect Tool works nice but it requires the edges to be selected. Just avoid Maya's shortcomings by using vrnDivCon


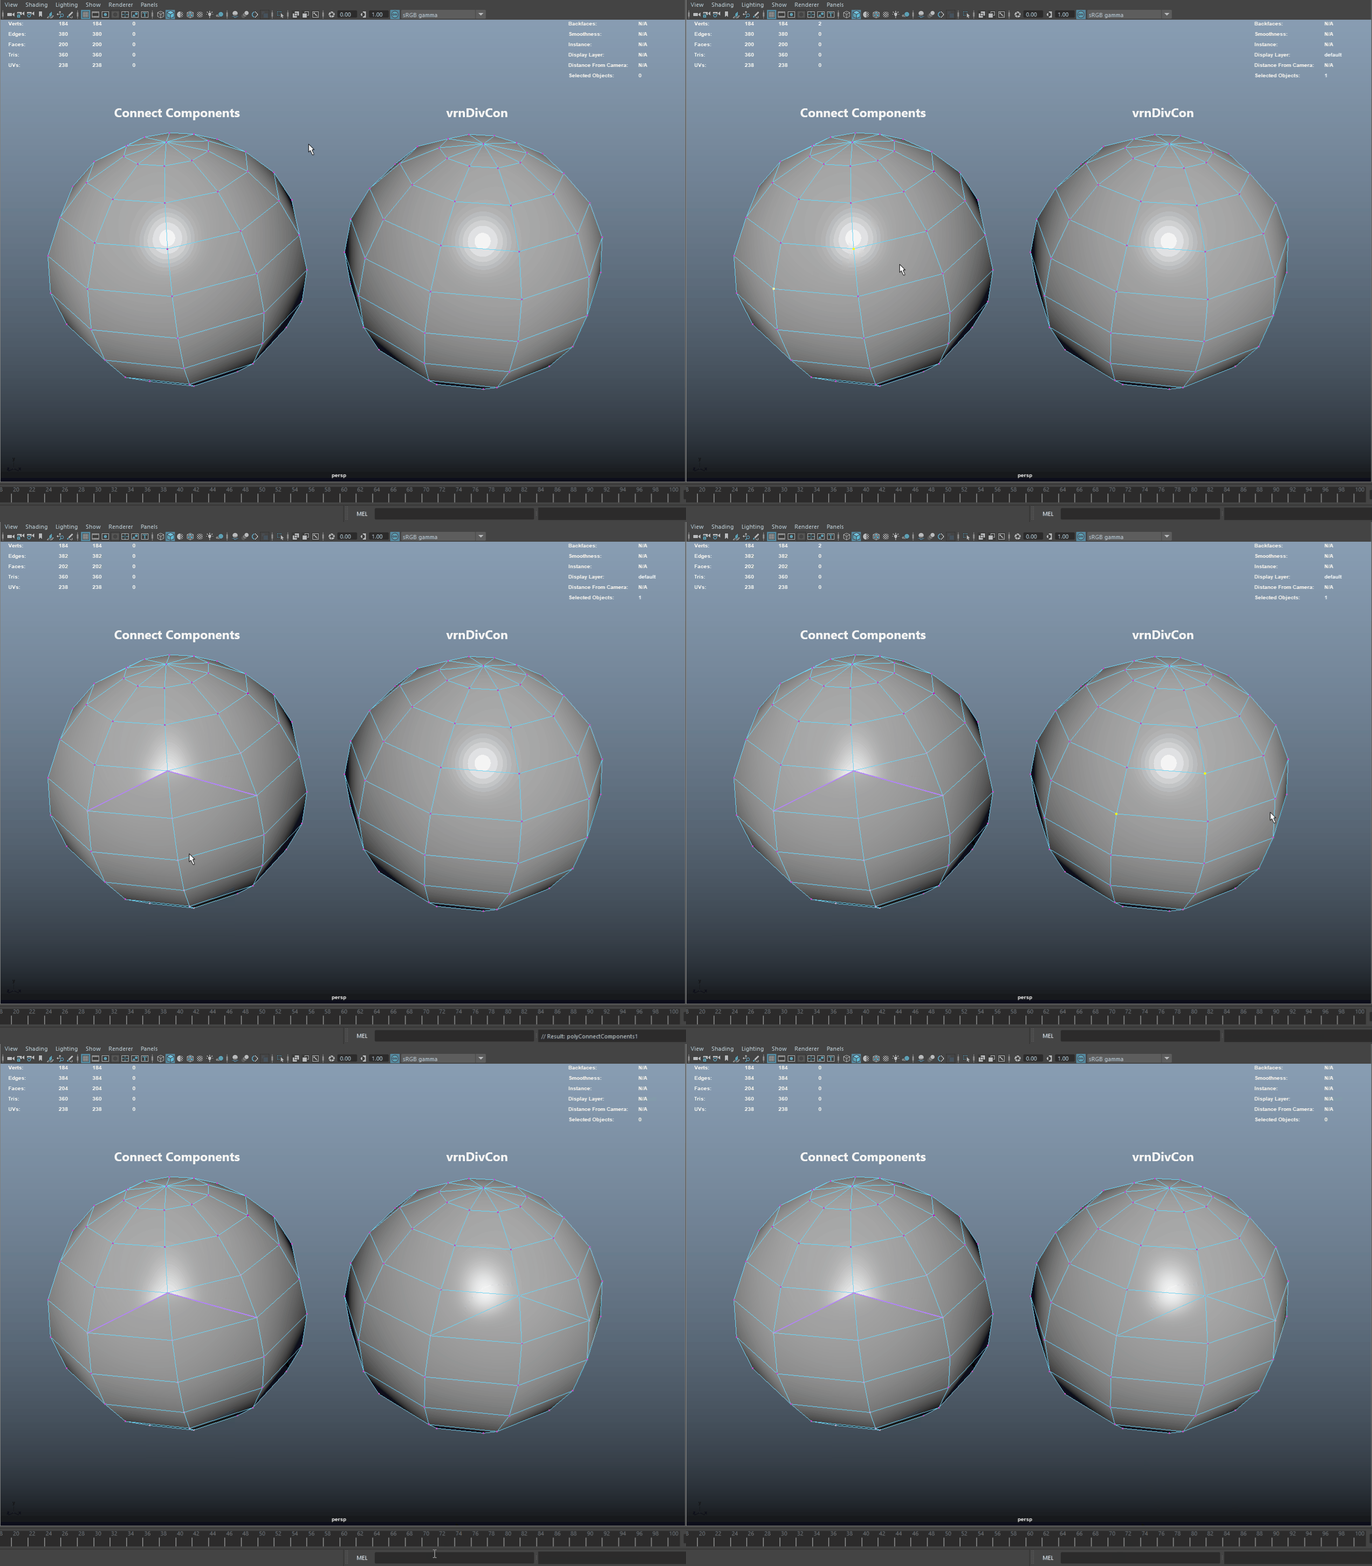
2. Multiple vertices: connects components and softens the newly created edges  with an angle of 60 degrees.

This is because the default polyConnectComponents command creates hard edges by default :(


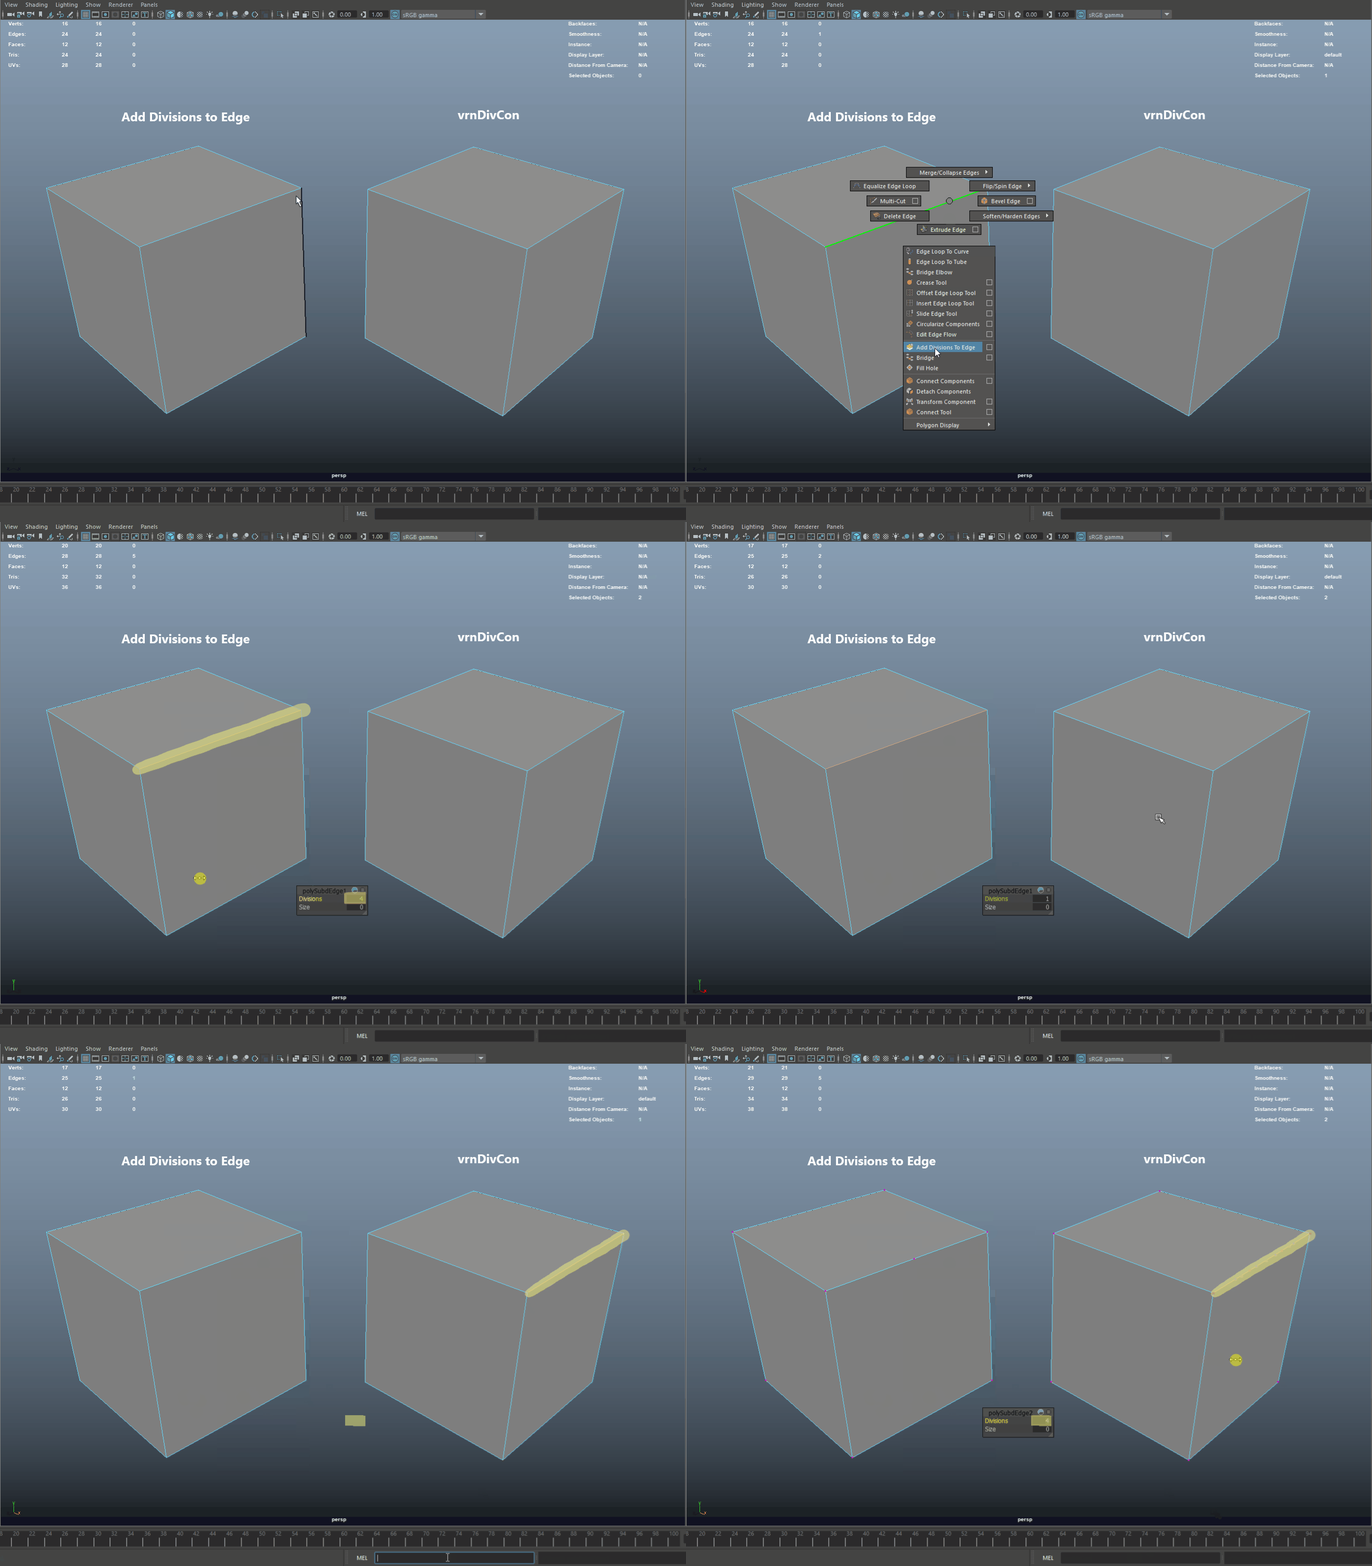
3. Single edge: Calls Add Division to Edge command. 

This allows the user to Middle Click Drag to change the number of inserted vertices. To aid the preview process, the script also puts the mesh into vertex component mode to allow visual feedback on the number of vertices added, something that Maya does not do by default.


4. Multiple edges/faces/multi-selection: Calls Connect Tool. Pretty self explanatory.


5. Single Face: Calls Poke Face.

Maya Mel Quick UVs Script: vrnAutoMap

General / 19 January 2018

Here is a step by step tutorial on how to install and run my vrnAutoMap.mel script, which you can download for free from Gumroad:

https://gum.co/vrnAutoMap

In short, the script automatically creates oriented UVs for the selected meshes and a UV layout for all the objects in the current selection for a single texture sheet. 

INSTALLATION:

1. Download the file from Gumroad, open the archive.

2. Copy "vrnAutoMap.mel" to My Documents/maya/<version>/scripts

Just replace <version> with your version of Maya. This was tested with 2017 and 2018, previous versions might lack some features and will probably not work.

3. If you plan on using this as a shelf button, feel free to copy the icon "vrnAutoMap.png" to My Documents/maya/<version>/prefs/icons

4'. Restart Maya
or
4". Type this in the Script Editor and press the numpad Enter button:

rehash

WHAT THE SCRIPT DOES:

1. Flattens the object with a Planar Projection on the current UV set.

2. All hard edges are converted to UV cuts.

3. Unfolds everything selected.

4. Orients all selected UV shells (Requires Maya 2017 Update 4 or newer)

5. Applies Layout UVs.

USAGE:

1. Select one or more meshes.

2. Type this command in the Script Editor and press the numpad Enter key:

vrnAutoMap(0,0,0);

3. Since the script uses the u3dAutoSeam command to cut the UV shells and ensure a proper unwrap, the results might need some tweaking. For example, here are some resulting UV shells that will require tweaking as follows:


a. Unnecessary UV cut. Just sew it:


b. Two other UV cuts that also result in a broken UV shell. Sew these together and then Unfold and Orient the new shell:


c. After fixing everything, select all objects/UV shells and re-apply the Layout UVs. Any changes you make to the Layout UV Options will be remembered next time you run vrnAutoMap:


OPTIONAL/ALTERNATIVE USAGE:

1.Custom UV cuts:

If you are not happy with the way "Auto Seam" chooses the UV cuts you can specify your own edges to be cut in UVs. To do this make sure you have the edges you would like vrnAutoMap to cut. This is very helpful when doing UVs for cylinders type meshes, for example hoses, in which case you might want to control where the cut along the cylinder goes.

2. Quick Soft/Hard edge:

If your mesh does not have proper soft/hard edges and you also want to let vrnAutoMap set them automatically, use this command:

vrnAutoMap(1,0,0)

This will open up a simple input dialogue that takes in an angle (default: 55) and applies soft/hard edges accordingly before running the UV part of the script.

CUSTOM USAGE:

The function can tweaked with these three arguments:

vrnAutoMap(x,y,z) replace x, y, z as follows:

x:First argument controls how soft/hard edges are handled.

x=0

    Script will use existing soft/hard edges. $angle is ignored. 

x=1

    Script will add soft/hard edges by $angle from a "promptDialog". Default value is 55 degrees.

    Use this if your mesh does not have soft/hard edges.

        Pro Tip: After running this use the new "3D Cut and Sew UV Tool" in Maya 2018 to cut, sew and unfold

        any remaining issues with your mesh. Make sure to check out the tool options to check out the specific

        shortcuts for this tool!

y: Second argument controls the texel resolution of the final pack in px/Unit as available in the UV Toolkit

y=0

    Script will ignore map size and will pack everything and fill the 0-1 UV space.

y<>0

    Will scale all shells to desired texel density and then pack to the lower left side of the 0-1 UV space.

z: Last argument is the map size, as available in the UV Toolkit. If y=0, this is ignored.

    Otherwise set as desired, preferably a power of 2.

Free 3d models (Sketchfab, CC Attribution)

General / 28 December 2017

To kick things off what I hope will be a periodically updated 3d graphics related blog, I've decided to share some of my Sketchfab models under the CC Attribution license. Basically, you're free to use them in your own projects, commercial or not as long as you credit me for it. I would appreciate if you use this link if you do: www.vrntech.ro

A Futuristic Truck concept I built more than 10 years ago while learning Maya's Subdivision surface workflow. 

An Antelope chair I made for my sister's Interior Design projects. Here you'll find a very used version of it with some quick Substance Painter textures.

Next up some low poly rims and tires I made for an Asseto Corsa mod a couple of years ago. I don't think it ever got released so here are two Nessen forged rims and two slightly used tires.

Last but not least, a rim of my own design, JDM style.

PS: If you need variations of these, let me know and I can make it happen!